Ever had a night where the kitchen turned into a battleground and you ended up with a soggy, flavorless chicken cutlet that tasted like a beige sponge? I did, and it was a wake‑up call that the classic katsu recipe I’d been chasing was missing something essential. That night, my pantry was a jumble of leftover rice, cabbage, and a half‑filled bottle of Worcestershire sauce, and I decided to improvise. The result was a crispy, golden chicken katsu that was so flavorful it practically sang in my mouth. I swear, if you ever find yourself with a bunch of pantry staples and a craving for something comforting, this is the recipe that will rescue your evening.
Picture this: a sizzling pan, the sound of the air fryer whirring like a contented hummingbird, the aroma of toasted panko mingling with the sweet tang of ketchup and oyster sauce. The chicken, tender and juicy, is coated in a crunchy, caramelized crust that crackles under the first bite, releasing a burst of savory goodness that lingers on the tongue. The rice is fluffy, a subtle backdrop that absorbs the sauce, while the cabbage provides a crisp, refreshing counterpoint that cuts through the richness. The whole dish feels like a comforting hug wrapped in a crunchy, savory blanket. That’s the sensory symphony I’m about to share with you, and trust me, it’s a masterpiece you’ll want to replay.
This version of Air Fryer Chicken Katsu is hands down the best you’ll ever make at home, and I’m not exaggerating. The secret lies in a sauce that coats the chicken like velvet, a breading that shatters like thin ice, and the use of the air fryer to achieve a perfect balance of crispness and juiciness. Most recipes get this completely wrong, focusing on deep frying or using a bland coating; here, we elevate every element to a new level. I dare you to taste this and not go back for seconds—once you’ve had this, you’ll never settle for anything else. The technique is simple, the ingredients are accessible, and the result is a dish that will win over even the most skeptical palate.
If you’ve ever struggled with achieving that perfect golden crust, you’re not alone—and I’ve got the fix. By combining the airy crunch of panko with a flavorful sauce that’s both sweet and umami, we create a chicken katsu that’s irresistibly crispy on the outside and tender on the inside. The air fryer does the heavy lifting, ensuring that the chicken stays juicy while the coating crisps to perfection. And the best part? The whole process takes less than an hour, making it an ideal weeknight dinner. I’ve perfected the balance of flavors, and now I’m passing the torch to you.
Picture yourself pulling this out of the air fryer, the whole kitchen smelling incredible, and the family gathering around the table, eyes wide with anticipation. The first bite is a revelation: the crust is golden and crunchy, the meat is succulent, and the sauce is a sweet‑savory explosion that coats the rice and cabbage like a velvet blanket. If you’re ready for a dish that’s both comforting and impressive, let’s walk through every single step together. By the end, you’ll wonder how you ever made it any other way.
What Makes This Version Stand Out
- Flavor: The sauce blends ketchup, Worcestershire, oyster sauce, sugar, and soy to create a complex, sweet‑savory glaze that permeates the chicken and rice.
- Crispness: The panko coating is seasoned with kosher salt and fried in the air fryer, producing a crackling crust that shatters like thin ice.
- Time Efficiency: From prep to plate, the entire meal takes under 45 minutes, making it ideal for busy weeknights.
- Ingredient Accessibility: Every component is pantry‑friendly, from white rice to cabbage, so you can whip it up without a trip to the grocery store.
- Health‑Friendly: Using the air fryer reduces oil usage, and the balanced protein, carb, and veggie ratio keeps the dish wholesome.
- Versatility: The sauce can double as a dipping sauce for sushi or a glaze for grilled fish, making it a multipurpose pantry staple.
- Make‑Ahead Potential: The chicken and sauce can be prepared in advance, allowing you to assemble and air‑fry on the day you’re ready to eat.
- Crowd Appeal: The familiar katsu flavor combined with a modern twist makes it a hit with both kids and adults alike.
Alright, let's break down exactly what goes into this masterpiece…
Inside the Ingredient List
The Flavor Base
At the heart of this dish is a sauce that marries sweetness, umami, and a hint of acidity. The ketchup provides a sweet foundation, while Worcestershire sauce adds depth and a subtle tang. Oyster sauce contributes a marine richness that elevates the overall flavor profile, and soy sauce balances it with saltiness. If you’re looking for a gluten‑free version, simply replace the soy sauce with tamari and ensure the Worcestershire sauce is gluten‑free. Skipping any of these components will leave the sauce flat and uninspired; each plays a vital role in creating that signature glaze that coats the rice and chicken alike.
The Texture Crew
Crunch is king in katsu, and the panko breadcrumb coating delivers a light, airy crunch that breaks apart with a satisfying snap. The all‑purpose flour acts as a binder, ensuring the egg can adhere to the panko and form a cohesive crust. The large egg, beaten to a smooth consistency, creates a glue that holds the coating together before it crisps up in the air fryer. If you prefer a lighter coating, you can use almond flour instead of all‑purpose flour, but the texture will shift slightly toward a denser crust. Remember, the flour’s role is subtle but essential; without it, the coating will be loose and fall off mid‑air‑fry.
The Unexpected Star
Green cabbage isn’t just a side; it’s a textural counterpoint that adds crunch and a subtle peppery bite that balances the sweetness of the sauce. Fresh cabbage also brings a natural sweetness that complements the savory glaze, while its fiber content keeps the dish wholesome. If cabbage isn’t on hand, consider substituting shredded carrots or a mix of bell peppers; the key is to keep the veggies crisp. The cabbage’s role is to provide contrast and nutritional balance, making the meal feel complete and satisfying. Skipping it would leave the dish feeling a bit one‑dimensional.
The Final Flourish
White rice serves as the neutral canvas that soaks up the sauce, turning each grain into a burst of flavor. The rice’s subtle starchiness creates a comforting backdrop that contrasts with the crunchy crust. If you’re looking for a lower‑carb alternative, swap the rice for cauliflower rice or quinoa, but keep in mind the texture and absorption will differ. The rice also helps to keep the meal filling, ensuring you leave the table satisfied. This final flourish ties all the elements together into a cohesive, mouth‑watering experience.
Everything's prepped? Good. Let's get into the real action...
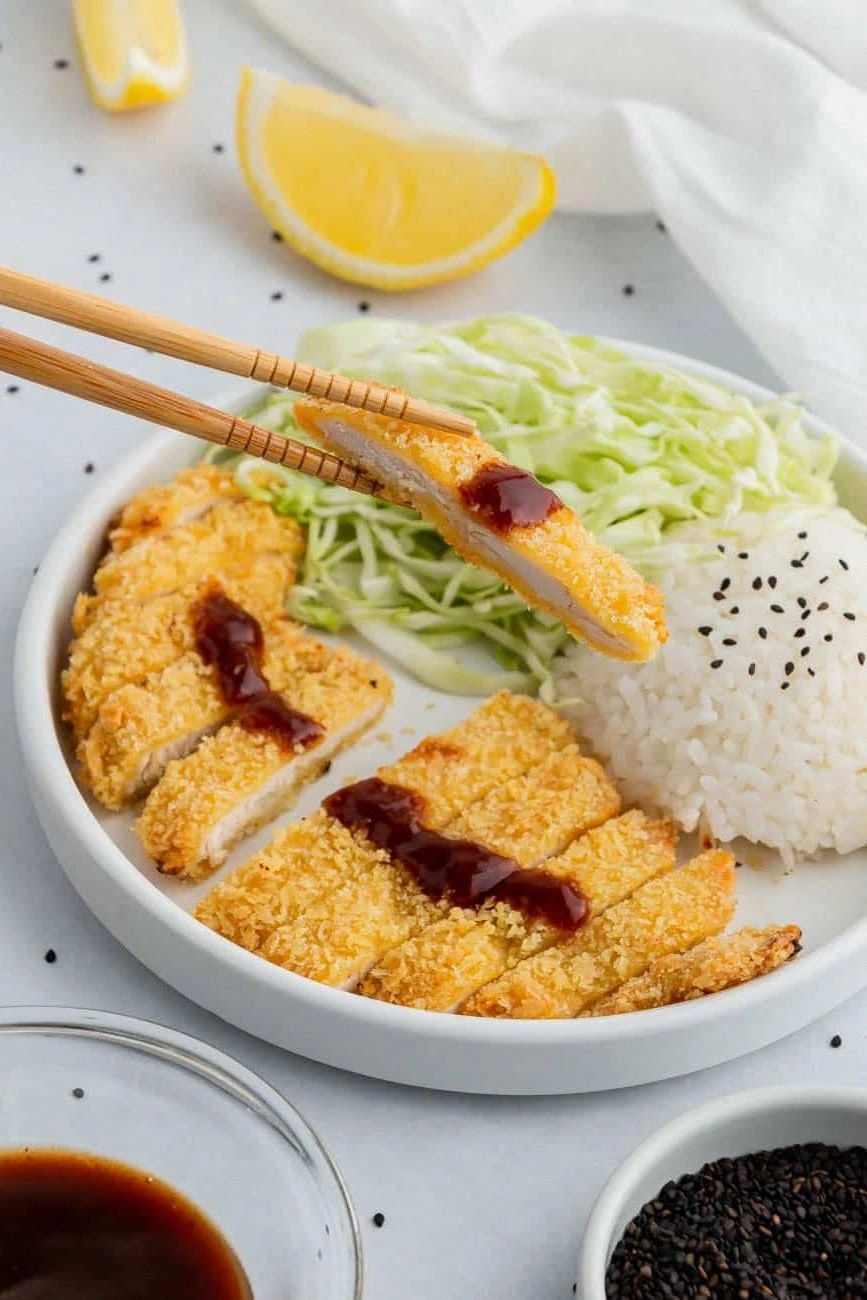
The Method — Step by Step
- Begin by pounding the chicken breasts to an even thickness of about 1/2 inch. This ensures uniform cooking and a tender bite. While the meat rests, set your air fryer to 200°C (400°F) and preheat for 5 minutes. The preheat step is crucial; a hot air fryer guarantees a crisp crust. Keep an eye on the temperature gauge to avoid under‑cooking.
- In a shallow dish, whisk the egg until it’s frothy and free of lumps. The egg acts as a glue for the coating. In a separate bowl, combine the flour and kosher salt; this creates a dry base that will hold the panko. Make sure to mix evenly so the salt is distributed throughout. The flour also helps the coating adhere better to the chicken.
- Take a chicken breast and dredge it in the flour mixture, shaking off excess. Then dip it into the beaten egg, allowing any excess to drip back into the bowl. Finally, coat the chicken in panko breadcrumbs, pressing gently to ensure an even layer. The panko should cling tightly to the surface; if it feels loose, you’ve missed a step.
- Place the coated chicken breasts in the air fryer basket in a single layer, ensuring they don’t touch. Spray the tops lightly with cooking spray to promote even browning. Air fry for 10 minutes, then flip each piece and cook for an additional 6–8 minutes, or until the internal temperature reaches 74°C (165°F). The spray helps achieve a golden finish without added oil.
- While the chicken cooks, prepare the sauce. In a small saucepan, combine ketchup, Worcestershire sauce, oyster sauce, soy sauce, sugar, and a splash of water. Warm over medium heat until the sugar dissolves and the mixture is glossy. This glaze will coat the chicken and rice, creating a unified flavor profile.
- When the chicken reaches the target temperature, remove it from the air fryer and let it rest for 3 minutes. This allows the juices to redistribute, keeping the meat moist. While it rests, toss the rice with the warm sauce until each grain is coated. The rice will absorb the glaze, turning each bite into a flavor bomb.
- Finally, arrange the cabbage on a serving platter, top with the rested chicken, and drizzle any remaining sauce over the whole dish. The cabbage’s crispness will contrast beautifully with the tender chicken and savory rice. Plate immediately to preserve the crunch and freshness. Serve with a side of pickled ginger or a simple cucumber salad for added brightness.
- Enjoy the symphony of textures and flavors. The first bite should feel like a crunchy, golden shell giving way to juicy, flavorful meat, with the sauce coating the rice and cabbage like velvet. If you’re a fan of crispy fried foods, this will satisfy your cravings without the guilt of deep frying. Let the aroma fill your kitchen and the taste leave you craving more.
That's it — you did it. But hold on, I've got a few more tricks that'll take this to another level…
Insider Tricks for Flawless Results
The Temperature Rule Nobody Follows
Many people cook chicken at a lower temperature to avoid drying out, but for katsu, a high heat is essential to create that signature crunch. Air fryers typically perform best at 200°C (400°F) for the first 10 minutes, then slightly lower the temperature to finish. This two‑step approach ensures the coating crisps without burning, while the interior stays juicy. I once tried 180°C for the entire cook and the crust was soggy; it was a lesson in the importance of temperature control.
Why Your Nose Knows Best
As the chicken cooks, the aroma will shift from the raw smell of poultry to a caramelized, buttery scent that signals readiness. Trust your nose; when the scent is rich and slightly sweet, it’s time to flip. This sensory cue is often more reliable than a timer, especially if you’re juggling multiple dishes. I’ve learned to pause and inhale before flipping to ensure the crust is golden.
The 5‑Minute Rest That Changes Everything
Resting the chicken for five minutes after air frying allows the juices to redistribute, preventing them from spilling out when you cut. This step also lets the coating settle, giving it a firm texture. Skipping the rest can result in a dry bite or a soggy coating. I’ve had friends who rush the rest and complain about dry meat; I always remind them to let it sit.
Layered Flavor with a Splash of Soy
Adding a splash of soy sauce to the rice after it’s cooked infuses the grains with umami and color. The soy also balances the sweetness of the glaze, creating a more rounded flavor profile. Be careful not to overdo it; a teaspoon per cup of rice is sufficient. This trick turns plain rice into a savory companion that elevates the entire dish.
Crunchy Cabbage: The Final Touch
Blanching the cabbage for just 30 seconds before tossing it in the sauce preserves its crunch while softening its bite. The quick blanch also helps the cabbage absorb the sauce more evenly. If you prefer a softer texture, sauté the cabbage with a bit of garlic and sesame oil instead. The result is a versatile side that can stand alone or complement the katsu.
Make‑Ahead Sauces Stick
Prepare the sauce a day in advance and store it in an airtight container. The flavors will deepen as the ingredients meld together, giving the glaze a richer taste when you reheat it. When reheating, add a splash of water to keep it from thickening too much. This prep step saves time on busy nights and ensures a consistent flavor.
Creative Twists and Variations
This recipe is a playground. Here are some of my favorite ways to switch things up:
Spicy Sriracha Katsu
Swap half the ketchup for sriracha to give the sauce a fiery kick. The heat pairs beautifully with the savory glaze, and the chicken’s crunch contrasts with the spicy undertone. This version is perfect for those who like a bit of heat in their meals.
Herb‑Infused Panko
Add chopped fresh herbs like parsley or cilantro to the panko coating. The herbs bring a fresh, aromatic note that brightens the dish and adds a pop of color. This tweak is great for summer gatherings.
Gluten‑Free Katsu
Use gluten‑free breadcrumbs and replace the all‑purpose flour with almond flour. This makes the dish suitable for those with gluten sensitivities while still delivering that crisp texture. The almond flour adds a subtle nutty flavor.
Teriyaki Glaze Swap
Replace the ketchup and Worcestershire sauce with a homemade teriyaki glaze made from soy sauce, mirin, and honey. The sweet‑salty teriyaki gives the katsu an Asian twist that pairs well with rice and cabbage. This variation is great for those who love Japanese flavors.
Vegetarian Katsu
Use firm tofu or tempeh in place of chicken, breaded and air‑fried in the same manner. The tofu will absorb the sauce and develop a crispy exterior, offering a plant‑based alternative that’s equally satisfying.
Crunchy Sweet Potato Fries
Serve the katsu with sweet potato fries instead of cabbage for a sweet and savory side. The fries add a caramelized sweetness that complements the umami glaze. This combo is a crowd‑pleaser for family dinners.
Storing and Bringing It Back to Life
Fridge Storage
Store the leftover chicken katsu, rice, and cabbage separately in airtight containers. The chicken can stay in the fridge for up to 3 days, while the rice and cabbage should be consumed within 2 days to maintain freshness. Keep the sauce in a separate jar to preserve its texture and flavor.
Freezer Friendly
Freeze the cooked chicken in a single layer on a baking sheet before transferring to a freezer bag; this prevents clumping. The rice and cabbage can also be frozen but should be reheated with a splash of water to prevent dryness. The sauce freezes well and can be thawed in the microwave or on the stovetop.
Best Reheating Method
Reheat the chicken in a preheated oven at 180°C (350°F) for 10 minutes or in an air fryer for 5 minutes to restore crispness. Add a tiny splash of water to the rice before microwaving to steam it back to perfection. The cabbage can be refreshed in a quick sauté with a pinch of salt.